|
|
|
|
|
|
|
|||||
|
|
   |
|
 |
||
IntroductionAdobe Photoshop is a powerful and flexible tool for the professional. You can do almost anything with your images with it… if you only knew how to use it! Over time, I hope to add more Photoshop tips. For now, we have only one on how to use the Unsharp Mask feature to maximize your image sharpness. New Technology NotesRecently, a Photoshop "action" script called Fractal Sharpen has become available. It does a much better job than unsharp mask (but requires that you own a copy of Genuine Fractals - which you need anyway to do resizes and printing). The same company also offers another set of tools, including one called Local Contrast. This is a very powerful tool to make your image stand out when printed - it recovers lost impact when going from display to paper. Digital PhilosophyWhat are you really doing when you are digitally processing an image? There are a number of schools of thought on that subject. Some believe you are changing it from a photograph to a false view of reality. This is common among "old timers" who have been using the darkroom and expensive equipment and techniques with the camera to improve images. They tend to believe that adjusting photographs digitally "ruins" them. Well, you certainly CAN ruin images with your computer! But really, the tools just got better. My philosophy - boiled down to its basics - is this: with digital image processing, I am able to recreate the image as I saw it, with the emotion and power of the real world image I experienced when I captured the image. While you can do many amazing and fun things with Photoshop besides this, such as composites and overlays, warping, etc., my real interest is using it as a tool to recreate - as best as possible - the full impact and glory of the original scene. Faithful recreation of the emotional response is my goal. Why does this work?What few people realize is the most problematic step in the entire photography process is the LAST step - printing the image from the negative. The image on the negative has much greater potential than you would ever realize by looking at a standard analog print! The color space transforms used by digital film scanners can extract incredibly accurate data from the film, by taking advantage of deep knowledge of the film's response characteristics to light. Effectively, and inverse transform is applied to the data, to faithfully reconstruct as best as possible the original scene. The result is that the digital scan is actually a much more accurate representation of the image then ever possible with analog methods. The result is - you can get significantly better images by working with the digital data than were ever possible in the analog darkroom days. Image SourceI prefer to work with high resolution images such as those created by scanning film. The most available of these is PhotoCD from Eastman Kodak. The PhotoCD is greatly preferred over a similar product, PictureCD, because it is 4x the resolution. The sharpening tips provided herein are not applicable to digital camera images because the images have already been heavily processed in the camera. Each camera manufacturer does it differently. Unfortunately, this means that different approaches are required for each manufacturer's product to improve sharpness. In some cases, it is too late - the image is already heavily sharpened, and cannot tolerate additional sharpening. My favorite provider for PhotoCD at a reasonable price is Dale Laboratories, in Hollywood, Florida. Visit their web site for more information. Resolution and CCD's
While there are some very good reconstruction filters used today, the reconstructed image DOES NOT have the same information content as a scanned 3-color image of the same resolution. Thus, a 1 million pixel digital camera image is NOT as good as a 1 million pixel film scan. A good rule of thumb is to cut in half the digital camera pixel count when comparing digital captured data with scanned data. Thus, a 6 million pixel PhotoCD image is about as good as a 12 million pixel digital camera - assuming it uses a color filter array such as the Bayer pattern. If 3 separate CCD's are used, then this 50% factor no longer applies. If there are enough pixels - or if you are not interested in the fine detail, then this factor generally will not matter too much. For fine photographic art or large nature prints, however, this is a serious issue. Thus, I will stick to PhotoCD and fine-grained film for a while longer - at least until I can afford a 12 million pixel digital camera! Taking it one step farther, you can get a "pro" scan on PhotoCD with 4x more resolution - a 72MB image. This will get you the absolute most resolution you can get off a 35 mm negative. Alternatively, you can buy one of the "top of the line" home film scanners, such as the Nikon Super CoolScan 4000 ED. This will give you even more detail in your images - if you use good enough lenses and film! Preparation: Color ManagementBefore you can start working with digital images with reasonable expectations of results, you need to get your workstation set up properly. Specifically, it is critical that the effects you are adjusting on your CRT monitor are closely correlated with the printed result (Do NOT under any circumstances use an LCD Monitor for color work! The color fidelity is not even close). There is no greater frustration than working for hours on an image, getting it to look "just right" on the monitor, only to find that the printed version does not look at all like you expected! I recommend Monaco EZColor Bundle as an inexpensive color management solution. This system includes a monitor colorimeter and a color "target" for you scanner. With this system, you can calibrate your scanner, monitor, and printer all at the same time. The results are impressive, indeed! Color Space IssuesThe CRT monitor works with RGB (Red, Green, Blue) additive color space, while the typical printer works with CMYK (Cyan, Magenta, Yellow, Black) subtractive color space. This means that it is impossible to render some colors you can see on your monitor on the printer (and vice versa). This is true even if the printer was perfect - i.e., the only limitations were the color space. In fact, typical printers can only print a fraction of the theoretically available color space due to dye chemistry and print technique limitations. However, you can come very close. Ink Jet PrintersI find extremely satisfactory the incredible prints you can get from the Epson ink-jet printers. My current printer is the Epson 1270. However, I strongly recommend the Monaco EZColor solution to get the results you want from the printer. Epson has moved on since I bought my printer, and has added a number of impressive features. Continued in right column... |
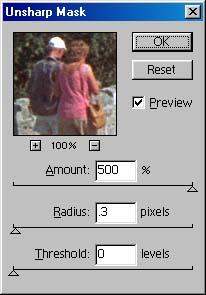
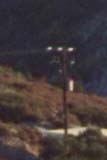
Continued from left column...Using UnSharp MaskThis goal is to bring out all of the hidden detail in a well-focused image, using the UnSharp Mask filter in Adobe Photoshop. This odd name comes from the fact that the sharpen algorithm only sharpens areas of the image which have edges or lots of detail. Areas which do not "measure up' are left alone - or masked off from the sharpen algorithm. This technique will NOT work for poorly focused or out of focus images. It will also NOT work for most digital camera images (see article on left). In this example, we are using the selection consisting of the entire image. The process also works with any selection within the image you may choose. I will often carefully select the sky, and then invert the selection, so the sharpening will only take place on the "non-sky" or the primary objects in the image. This eliminates a problem of grain showing up in the sky. The basic rule is that graininess can be most easily seen in areas with little detail, such as sky or flat surfaces. These should be selected out before using the Unsharp Mask tool. Unsharp Mask has three settings. In Photoshop, they are called Amount, Radius, and Threshold. The amount setting defines how much sharpening is to be applied. The Radius defines the diameter of the circle around each pixel to evaluate for a change. The Threshold defines how much change must occur to pass muster, and not be masked. Typical sharpen settings are something around 75, 1.2, and 4. However, these settings do not do justice to a well focused image, as you will see in this example. Below you see the original image shrunk to 240 x 160. The original image is actually 3072 x 2048 pixels, so this is a very small copy. Directly to the right, you see an area of interest, blown up to 1:1 - i.e., this is full resolution, one screen pixel for each image pixel. Note: this is a picture of the Old Town fort in Rhodes, Greece.
Next, let's apply the "normal" kind of Unsharp mask settings, and look at the result, shown above. I used 100, 1.2 and 4 in this case.
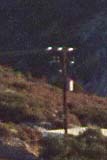
You can see some noticeable improvement in the image. But wait! There is a lot of detail there you can't see yet! Let's try a completely different setting set this time, shown below:
In this image, you can see even more detail than before! And this is really not even an "ideal" image for the demonstration (see below). Specifically, it almost does not fit the requirement given at the beginning. This image is slightly soft - not really well focused. I used this example to show that even at the edge of applicability, this technique works pretty well. The Threshold in this example was set to 0. This means there was no masking - any change would be sharpened. Typically, I use a value of 4 to 6. This reduces sharpening of the grain of the film in the image. However, grain is mainly noticeable in the sky or areas of flat color with no detail. An Even Better ExampleHere is another example, with a better focused image. Note: this was taken from a fort on the west coast of Rhodes, Greece.
The basic rule is, try high Amount values with small Radius value - smaller for better focused images. I have used values down to 0.2 for the Radius, and often use 500 for Amount. Good luck with your sharpening efforts! Keep trying until you get the results you want. Experience is the best teacher! |
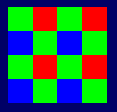 Images from a digital camera are typically created from an image
sensor (CCD) that uses a "Bayer" pattern of color filters, shown to
the right. Each pixel is actually only one color: red,
green, or blue. The green pixels take up 50% of the available
pixels, while blue and red take 25% each. The information
received from the CCD must then be "reconstructed" back to a full
RGB image. Thus, for a green pixel, blue and red must be
recreated from surrounding red and blue pixels, etc. This
pattern requires a "blur" filter in the lens system to prevent color
artifacts from the reconstruction process - further degrading the
sharpness of the image.
Images from a digital camera are typically created from an image
sensor (CCD) that uses a "Bayer" pattern of color filters, shown to
the right. Each pixel is actually only one color: red,
green, or blue. The green pixels take up 50% of the available
pixels, while blue and red take 25% each. The information
received from the CCD must then be "reconstructed" back to a full
RGB image. Thus, for a green pixel, blue and red must be
recreated from surrounding red and blue pixels, etc. This
pattern requires a "blur" filter in the lens system to prevent color
artifacts from the reconstruction process - further degrading the
sharpness of the image.